How to Start Print on Demand on Shopify
A real Shopify walkthrough: pick a provider, connect the app, sync your first product, price it to make money, and launch, the step every other guide skips.

Print on demand removes the two things that usually stop someone from opening a store: inventory and upfront cash. You design something, connect a provider, and they print and ship it only after a customer pays for it. Everything below is the actual mechanics of doing that on Shopify, provider by provider, screen by screen, priced with real numbers.
TL;DR
- Pick the provider by trade-off, not brand. Printful for tighter quality control and easier returns, Printify for the lowest unit cost at volume, Gelato for international orders where local production cuts shipping time.
- Connecting a POD app to Shopify is the same five steps for every provider: install from the App Store, link your account, browse the catalog, add your design, sync the product. No provider makes this meaningfully harder or easier than another.
- Your Shopify subscription is the real fixed cost, not the provider. Provider fees are pay-per-order with zero inventory risk; Shopify's Basic plan runs $27/mo whether you sell one shirt or a thousand.
- Price for a 30-40% margin after the base cost, not a round number, and budget separately for returns and reprints, they come out of your margin whether you planned for them or not.
- A synced product ships with a stock mockup and a placeholder description. That's the step every other guide treats as a footnote. It's the one that actually decides whether the product sells.
Choosing a Print on Demand Provider
The three providers everyone lands on are Printful, Printify, and Gelato, and none of them is objectively "the best." They're built for different failure modes, and the honest way to choose is to pick the failure mode you're better positioned to handle.
Printful: fewer SKUs, tighter quality control
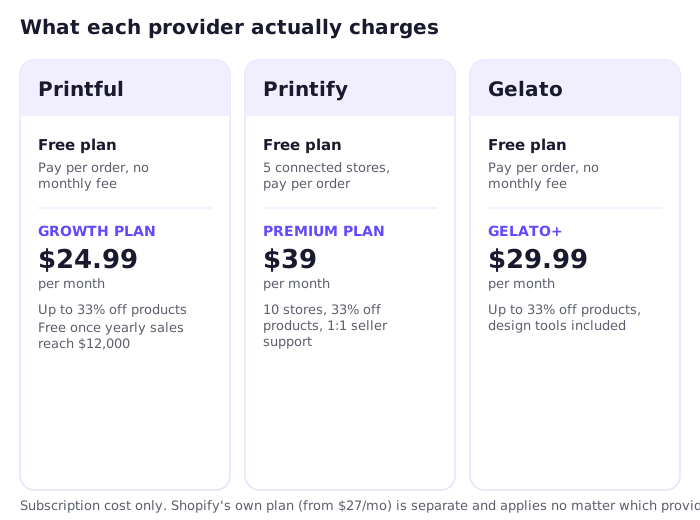
Printful runs its own fulfillment centers rather than routing orders through a marketplace of third-party print shops, so quality is more consistent between orders and a return is one company's problem to fix, not two. The Free plan costs nothing to join, you pay per order. The Growth plan is $24.99/mo, unlocks up to 33% off product costs plus 9% off branding, and becomes free once your yearly sales pass $12,000. A Bella+Canvas tee starts around $11.50, a Gildan hoodie around $26, an 11oz mug around $5.95, base costs before your markup.
Printify: the lowest cost at volume
Printify is a marketplace layered over dozens of print partners, so you're generally choosing the cheapest or fastest partner for a given product rather than getting one company's own fulfillment. More catalog variety and typically lower base costs, at the cost of more variance between one order and the next depending on which partner fills it. The Free plan supports 5 connected stores; Premium is $39/mo for 10 stores, a 33% product discount, and 1:1 seller support. That $39 price is new as of February 2026, up from $29, a jump that drew real pushback from existing subscribers when it landed.
Gelato: built for international orders
Gelato's pitch is production location. With local print hubs across 32 countries, a meaningful share of international customers means local printing shaves real days off shipping instead of a transatlantic parcel. The Free plan costs nothing to join; Gelato+ is $29.99/mo (or $239.88 billed yearly) for up to 33% off products plus its design and mockup tools.
If you're not sure yet: start on the Free plan of whichever provider has the product you actually want to sell in your target print quality. You can add a second provider to the same Shopify store later without touching your existing listings, nothing here locks you in.
Connecting Your Provider to Shopify
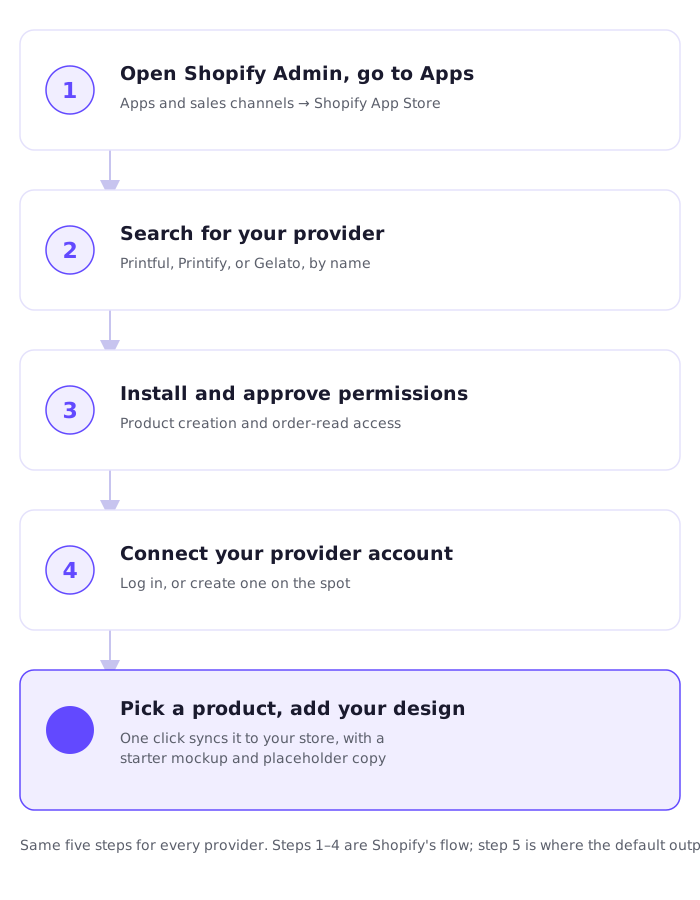
This is the part every other guide treats as a footnote. It's five steps, and the shape is identical for Printful, Printify, and Gelato, only the app changes.
Step 1: Install the app from the Shopify App Store
From your Shopify admin, go to Apps and sales channels → Shopify App Store, search for your chosen provider by name, and click Install. Shopify shows you exactly what the app is asking for, mainly permission to create and edit products, and to read order data so it knows when something needs printing. Approve it and the app opens inside your admin, no separate login screen yet.
Step 2: Connect your provider account
The app asks you to either sign into an existing account with that provider or create one on the spot, free, no card required for the Free tier. This authorization happens once. After that, syncing products and fulfilling orders happens automatically in the background, you're not re-approving anything per order.
Step 3: Browse the catalog and pick a product
Every provider app has its own catalog inside your Shopify admin, t-shirts, hoodies, mugs, posters, phone cases, dozens more, each with the specific print areas, color options, and size ranges that provider actually stocks. Pick the base product before you pick the design. A design that reads perfectly on a flat tee can crop badly on a mug's curved surface or a phone case's narrow print zone, check the print area dimensions the app shows you before you commit to artwork.
Step 4: Add your design
Upload your own artwork, PNG or a high-resolution design file, 300 DPI is the safe default across providers when they don't specify otherwise, or use the provider's built-in design tool if you're starting from nothing. The app generates mockups automatically, your design applied to real product photos, so you can see roughly what a customer will see without ordering a physical sample first. Order one anyway before you go live. A screen mockup and a printed product don't always match on color.
Step 5: Sync to your store
One click pushes the product into your Shopify catalog with the provider's mockup, a starter price you'll want to change, and a title along the lines of "Custom Unisex T-Shirt." That title isn't a description, it's a category label. Every other store selling from the same provider catalog starts from that exact mockup and that exact placeholder line, so a freshly synced product competes on nothing until someone rewrites it into a page a stranger would actually buy from.
Setting Up Your Shopify Store
A handful of settings, separate from the provider app, determine whether an order you take actually reaches a customer correctly billed and correctly taxed.
Pick a plan
Shopify's plans run Basic at $27/mo, Grow at $72/mo, Advanced at $399/mo, and Plus starting at $2,300/mo for large-volume merchants. Basic covers a first POD store completely, unlimited products, one staff account, Shopify's standard checkout. Upgrade when you outgrow the reporting depth or the staff-account limit, not before you've made a sale.
Payments and the fee you'll actually pay
Use Shopify Payments where it's available in your country, it's Shopify's own processor and it avoids an extra fee. Route payments through a third-party processor instead (PayPal alongside Shopify Payments, for instance) and Shopify adds a 2% transaction fee on top of whatever that processor already charges, on the Basic plan specifically. That added fee drops on the higher tiers.
Shipping and tax
Your provider handles physical fulfillment, but shipping rates and tax collection live in Shopify's settings, not inside the provider app. Set shipping rates that roughly track what your provider actually charges you, most publish an exact rate calculator by destination, so you're not quietly absorbing the difference on every order. For tax, Shopify's built-in settings handle US state-by-state rules automatically once your business address is entered. Selling into multiple countries or states with genuinely different rules is where a dedicated tax app earns its monthly fee, worth adding before volume, not after an audit letter.
A custom domain, before you launch, not after
A .myshopify.com address works technically but reads as unfinished to a shopper deciding whether to trust you with a card number. Buy a domain, through Shopify or elsewhere, and connect it from the Domains page in your Shopify admin before you start sending anyone traffic. Doing it after launch means every link you've already shared, an early customer's order confirmation included, points at the address you're trying to move away from.
The legal pages checkout actually needs
Shopify's checkout expects a refund policy, a privacy policy, and terms of service, and a real shopper checks for them before entering a card number, especially on a store they've never heard of. Shopify generates baseline versions of all three for free under Settings → Policies, built from your store's actual details. They're a starting point, not a finished legal document, but a store with none of the three reads as a risk to skip, template or not.
Pricing for an Actual Margin
The base cost from your provider isn't your real cost, and pricing at "base cost plus a nice round number" is how a lot of new POD stores discover they're barely breaking even three months in.
Start from a target margin, not a target price. A common range is 30-40% after the base cost. On a tee with an $11.50 base, a 35% margin lands you around $17.70, though most POD tees that actually sell price in the $22-28 range once the brand positioning is worth something, not just the fabric. Two costs new sellers routinely forget to price in:
- Returns and reprints. A defective print or a sizing mismatch is a reprint at your cost, not the customer's. Build a couple of points of margin specifically for this, or you'll notice it eating your actual profit at the end of the month instead of in your pricing model where you could plan for it.
- The subscription tier you need to hit workable margins. Printful's Growth plan's 33% product discount can be the difference between a viable margin and a break-even one at any real volume, so that $24.99/mo isn't optional overhead, it's part of your unit economics from day one.
The Product Page Is the Step Every Guide Skips
Go back to what Step 5 actually hands you: a stock mockup showing your design on a plain model or a flat lay, and a title that reads like a SKU, "Custom Unisex T-Shirt, 100% cotton." That's not a finished listing. It's a placeholder that happens to be live and taking orders.
The fix has three concrete parts, not vague advice to "optimize your listing":
- Replace the placeholder title and description with something that says what this product actually is and who it's for. "100% cotton" is a spec. "Runs slightly oversized, soft after the first wash, printed on the front left chest" is a description someone can act on. Writing it in an actual brand voice instead of a spec sheet is where most first-time POD stores get their single biggest lift.
- Add real product photography, or at minimum a proper lifestyle mockup. A design shown being worn or used reads completely differently from a floating flat lay on white, even when it's the identical print.
- Give the shopper a specific reason to buy here. The same blank hoodie from the same Printify catalog is on a hundred other stores today. What's different isn't the hoodie, it never is, it's everything you build around it.
We broke down exactly what separates a page like this from one that converts, with real before-and-after examples from three stores that made real money, in our teardown of what a losing POD page looks like next to a rebuilt one.
Essential Tools for a New POD Store
Beyond the provider app itself, a handful of tools cover almost everything a new store actually needs in the first few weeks, all with a genuinely free way to start.
- Canva, for the design itself. Most POD artwork doesn't need more than a basic layout tool, and the free tier covers it even with zero design background.
- Judge.me, for reviews. Free plan, unlimited reviews. A store with no reviews at all is a harder sell than one with an average design and a handful of honest ones.
- Klaviyo, for email. Free to install, for the list you should be building from your first visitor, not after your first slow month.
- BrandyBee, for the step every provider hands you unfinished: the product description, the images, and the page itself, rewritten from what you actually synced instead of the provider's placeholder.
None of these are required to launch. They're what separates a store that looks assembled from one that looks like a brand.
Marketing Your First Products
Once a handful of products are live with real pages behind them, not the provider's defaults, the fastest free channel for a new POD store is short-form video: TikTok and Instagram Reels showing the design, the product, and the actual story behind it, not a hard sell. Pair that with basic keyword work on your product titles and descriptions so organic search brings in shoppers who weren't already looking for your store by name, and track whether those rankings are actually moving rather than guessing. Paid ads are worth spending on once you know a product page converts. Before that, they just find out you have a conversion problem, faster and more expensively than waiting would have.
Frequently Asked Questions
How much does it cost to start a print on demand store on Shopify?
Shopify's Basic plan is $27/mo, and provider fees are pay-per-order with no upfront inventory cost, so a realistic minimum to launch is your Shopify subscription plus whatever time you put into the first few product pages. Most of the real cost shows up later, in the margin you didn't plan for and the subscription tier you end up needing to protect it.
Can I start print on demand with no money?
Every major provider, Printful, Printify, Gelato, has a Free plan with zero signup cost, you only pay when an order actually ships. The one cost you can't avoid is Shopify's subscription, though a free trial covers your first few weeks of setup before a paid plan kicks in.
Which print on demand provider should I use for Shopify?
Printful for tighter quality control and easier returns, Printify for the lowest base cost at real volume, Gelato if a meaningful share of your customers are outside the US. All three connect to Shopify through the same five-step flow, so the real decision is your product and your margin, not the integration itself.
How long does it take to launch a print on demand store on Shopify?
The technical setup, plan signup, app install, first synced product, fits in an afternoon. Building product pages that actually convert instead of shipping the provider's default mockup and placeholder title is the part worth spending real days on, not the part to rush past.
What product should I start with on print on demand?
Apparel, t-shirts and hoodies, is where most new stores start, it has the widest provider selection and the most design real estate to work with. The better filter than "what's popular" is what you can say something specific about. A print you actually have an angle on outsells a trend you copied, because the page can say something real instead of restating the category.